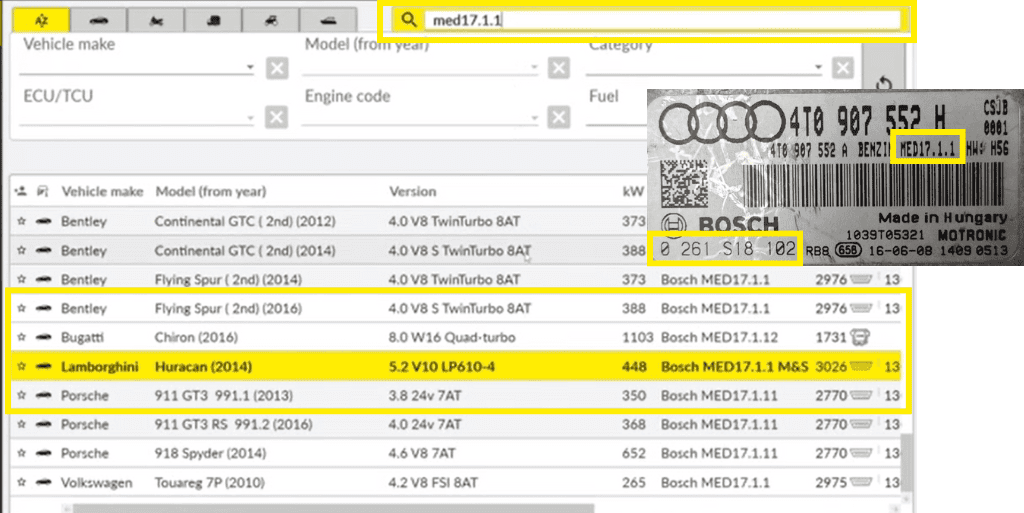
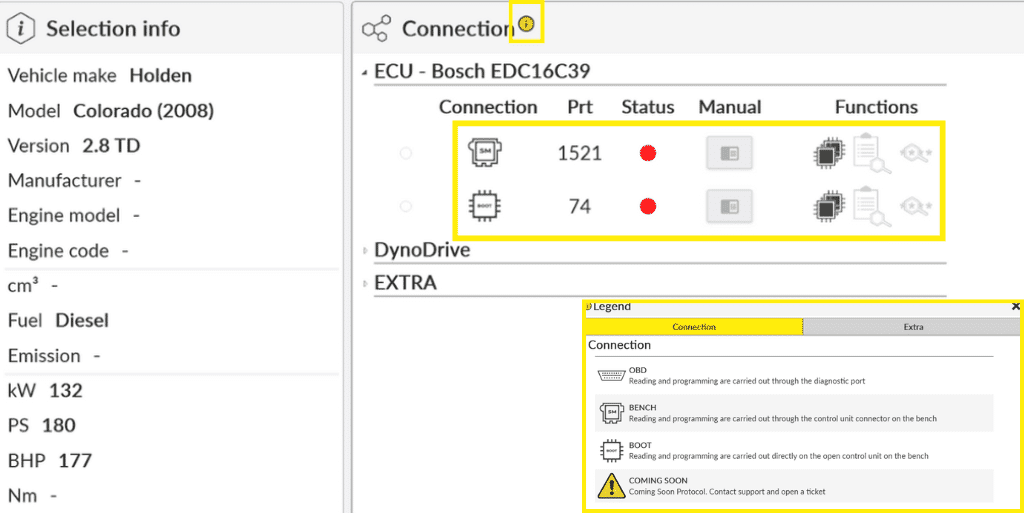
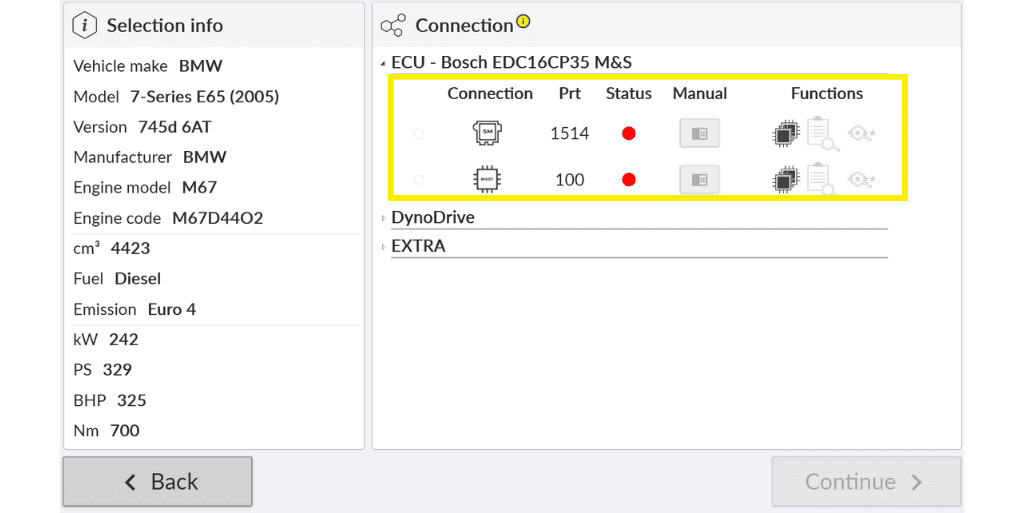
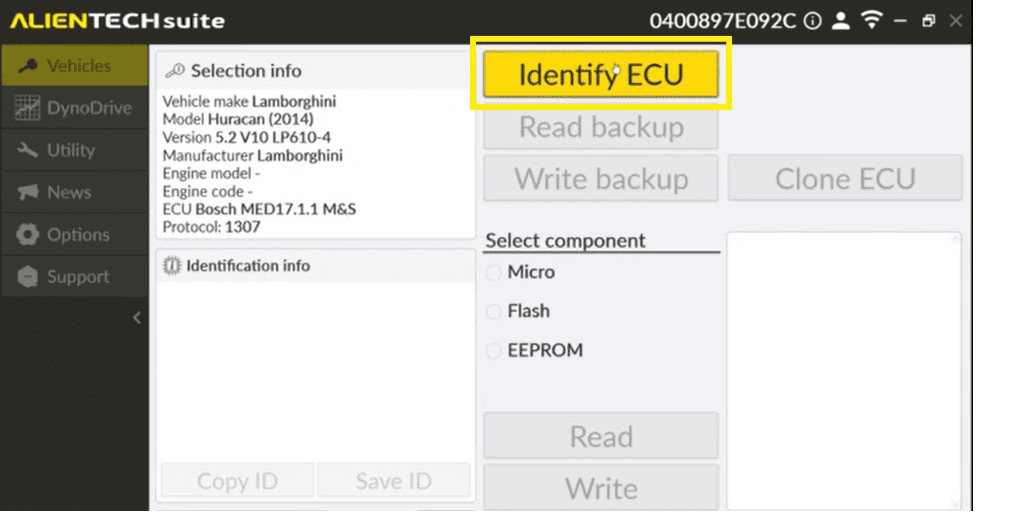
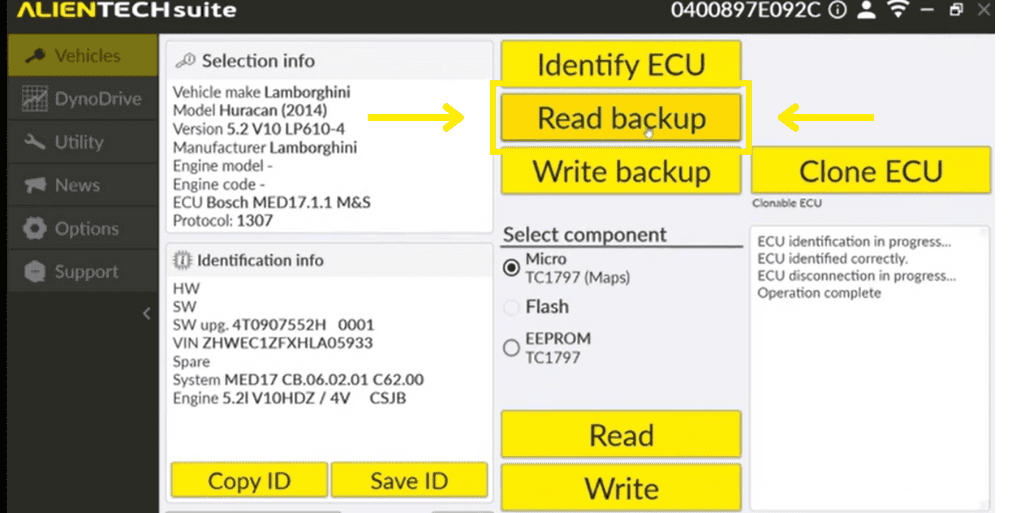
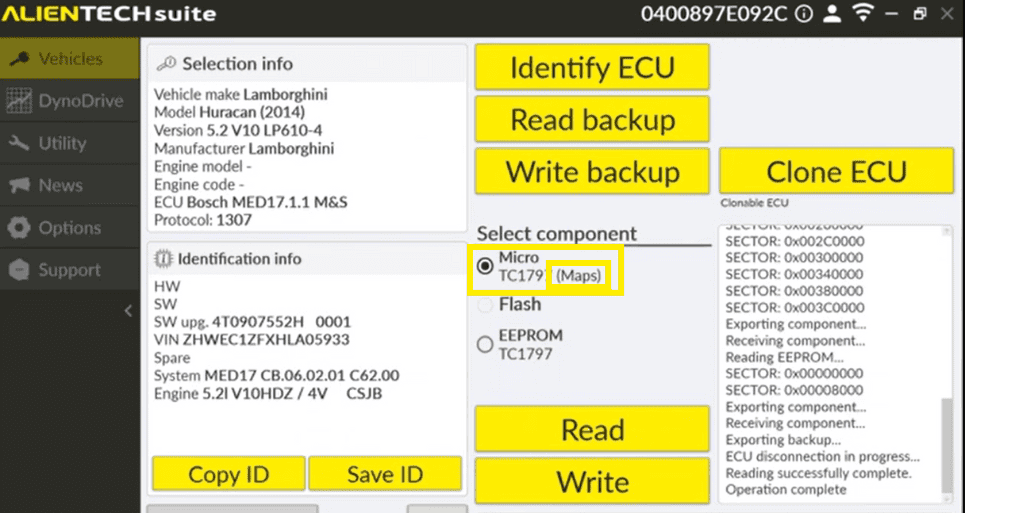
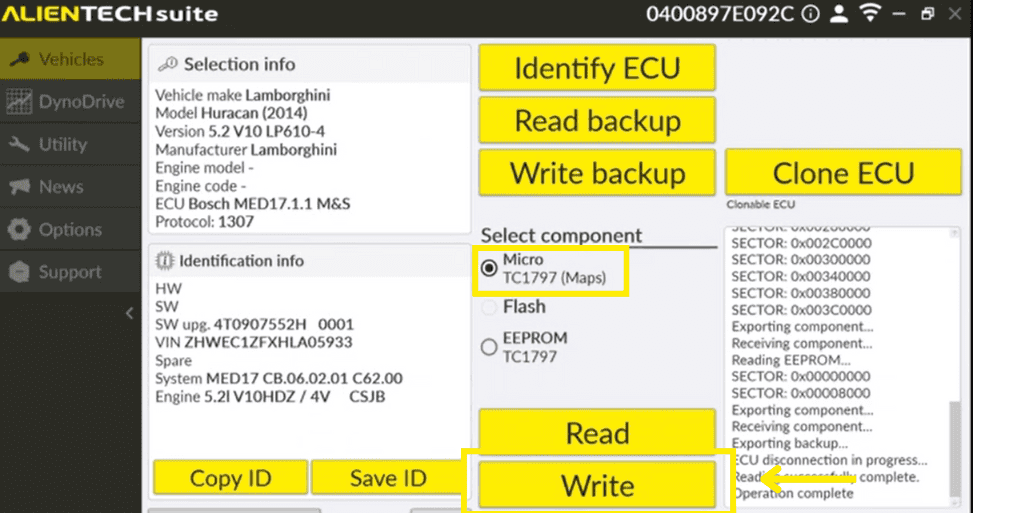
Alientech KESS3 Instructions
Here is a guide to how to use the Alientech KESS3
How To Check If You Can Tune A Vehicle Using Alientech KESS3
Use Alientech Suite to easily check for vehicle compatibility before connecting to a tool
Step 1:
Download or open Alientech Suite and follow the prompts to update.
Software and vehicle list can need updates weekly.

Step 2:
Use the search box in the top right to search for the vehicle or ECU model.
Or
Use the drop-down list to select the vehicle you are looking for.
Please Note
If the vehicle ID is not presented on the list you may need to check for:
Different make/model with the same engine
Or
Type ECU model and generation in the SEARCH bar is often the simplest way to find your match.

You can also locate the ECU model on the ECU label.
Use the search box in the top right corner of Alientech Suite to then find a suitable option from the listed ECUs.
The ECU model is the most important to have correct even if your specific vehicle is not listed.

What to do if a Bosch ECU has no model number?
If you have a Bosch ECU and there is no model number on the label visit this page and enter the bosch part number in the search box.
The following page will show the model above the picture
https://www.bosch-repair-service.com/en/category/engine-control-unit/
You can also locate the ECU model on the ECU label.
Use the search box in the top right corner of Alientech Suite to then find a suitable option from the listed ECUs.
The ECU model is the most important to have correct even if your specific vehicle is not listed.

Step 3:
Once you have found the vehicle or ECU you are looking for you can open the vehicle option and check for connection options.
Click on the icon and you will find a legend for the icon descriptions.
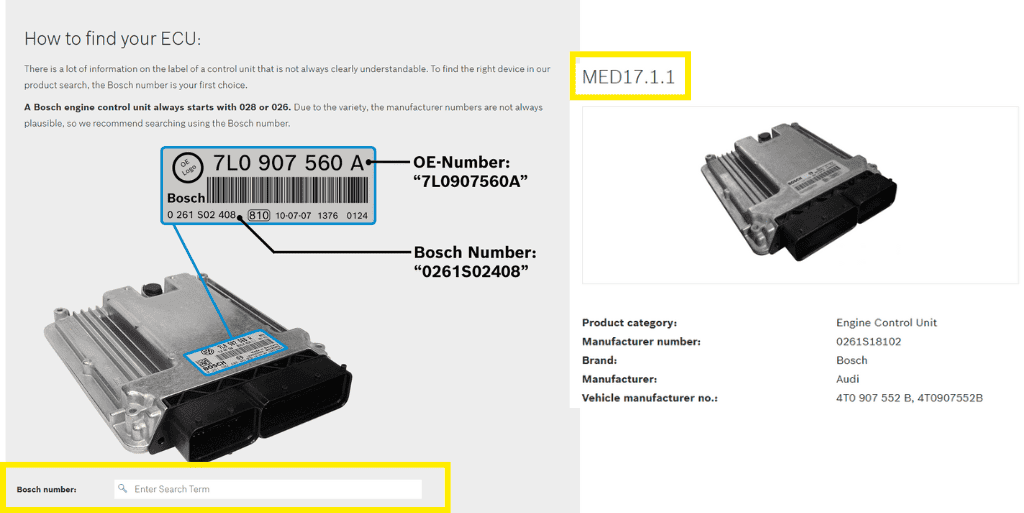

How To Use Alientech KESS3 Via OBD
This is a guide to how you read and write an ECU via the OBD port on a vehicle using Alientech KESS3. Use Alientech Suite to easily check for vehicle compatibility before connecting to a tool
Step 1:
Please make sure that all of the following points are done before starting:
- Check the vehicle for fault codes BEFORE starting!
- Ensure that the laptop is charged or is plugged into a suitable power source.
- Connect the laptop and tool through the USB cable before connecting to the vehicle.
- Make sure you are connected to FAST internet and have a STRONG WIFI signal

Step 2:
Connect a quality battery charger to the vehicle’s battery.
Please note:
A charger capable of a minimum of 20A is recommended, but bigger is better. Some vehicles can draw over 70A during reading and writing.
It is recommended that the vehicle’s battery is in good condition.
The charger must remain connected to the batter during both reading and writing.

Step 3:
Start up Alientech Suite on your laptop.
Please complete any software updates before starting.
Wait for Alientech Suite to finish syncing to the server and updating the tool.

Step 4:
Connect Alientech KESS3 to the vehicle’s OBD connector.
The OBD connector is often located in the driver’s footwell.
If you are unable to locate the OBD connector. It can be helpful to have a quick search on the internet.

Step 5:
Use Alientech Suite to search for the vehicle, engine and ECU type.
- The vehicle model is used as a guide to finding the correct ECU. The focus is the ECU brand and model.
- If the correct ECU can’t be found in the list and/or will not ID your vehicle model listed you may need to physically locate the ECU and obtain ECU numbers/models.

Step 6:
Select the OBD option.
Please note:
Some vehicles do have specific instructions which MUST be followed so please check and read the manual (e.g. storing injector code or ECU passwords).

If there is no “OBD” option you will need to select the “Service mode”.
Please see our guide on “How to use Alientech KESS3 in service mode”.

Step 7:
Read the ECU ID
- ID the ECU by selecting the “ID” option.
- Select “Continue” and follow the on-screen instructions as supplied.

Step 8:
- Read the ECU file by selecting the “READING” option.
- If there is no “READING” option available, use the “ID-only” option and a Virtual Read file will be saved.
- Select “Continue” and follow the on-screen instructions as supplied.

Step 9:
Save the ECU file.
When saving the ECU file it is a good idea to follow some good naming conventions so they are easy to recognise and don’t get lost.
- When saving the ECU file make a folder in an easy place to locate i.e. the desktop.
- Save both the ECU identification info and the ECU file.
- Use the vehicle’s registration, customer name and vehicle as a file name.
- It is recommended to make a folder dedicated to each individual vehicle.
You will need the ECU read file (or virtual read) to create a job on the file service. If there are no read please upload the ID file.

Step 10:
Write the ECU file back to the vehicle.
When the modified file comes return save it in the same folder created for the vehicle.
- Select “Writing” and continue to locate and select the modified ECU file.
- Follow the prompts and allow Alientech to check the file.
- Select “OK” when asked if you want to proceed with the writing.
- Follow the prompts until the writing is completed.

Step 11:
Check the operation of the vehicle
- Start the vehicle and confirm the engine is operating ok.
- It’s recommended to start and stop the engine 3-4 times to allow basic limitations to be relearnt for things such as fuel solenoids and boost control.
- Check for and clear any system DTC’s these may be communication faults in body systems.
- Road test the vehicle.

How To Use Alientech KESS3 In Service Mode
This is a guide to how you read a write an ECU via the OBD port on a vehicle using Alientech KESS3
Step 1:
Start up Alientech Suite on your laptop.
Please complete any software updates before starting.
Wait for Alientech Suite to finish syncing to the server and updating the tool.

Step 2:
Locate the ECU model on the ECU label.
Use the search box in the top right corner of Alientech Suite to then find a suitable option from the listed ECUs.
The ECU model is the most important to have correct even if your specific vehicle is not listed.

What to do if a Bosch ECU has no model number?
If you have a Bosch ECU and there is no model number on the label visit this page and enter the bosch part number in the search box.
The following page will show the model above the picture
https://www.bosch-repair-service.com/en/category/engine-control-unit/

Step 3:
Select the ‘Service mode’ option and then “Continue”.

A prompt will come up and ask if you want to see the manual. Select the “Green Tick”. This will open the connection and pinout instructions.

Step 4:
Read and understand the shown warnings.
Be sure to read through and follow the instructions. some ECUs can have very specific requirements which must be followed.

Step 5:
Scroll down until you can see a picture of the ECU connectors with clear labelling of the required connections and what those connections are.
If you find that the connectors are not the same, STOP!
Return to the “search” page to find a suitable option.

Hovering the mouse over the connector picture will give a zoomed-in version.

Step 6:
Set up your bench.
- Have a clear area of the bench space to set up your laptop, KESS3, power supply and ECU.
- Connect all terminals to the ECU with the power supply off.
- Once connected DOUBLE CHECK all connections are correct and have made good connections.
- When all is confirmed correct and are ready to read, turn the power supply on.

Step 7:
Identify and read the complete ECU.
First, select “Identify ECU”, this will confirm the correct ECU and protocol have been selected.

Once it has identified that it is the correct ECU select “Read Backup”. This will read all components of the ECU.
This is important as all components will be required to recover the ECU should an issue arise during the work or in the future.

Step 8:
Identify the correct file to upload to the job.
- Once the ECU has been identified the different components will show. MAPS will be noted at the end of the component containing the tunable files.
- The largest of the saved files is the MAPS file. This is the file to be uploaded then opening a new job.

Step 9:
Writing the modified file back to the ECU.
- Confirm terminals are still connected and in the correct location.
- Confirm voltage supply is still correct and on.
- The component containing the MAPS must be selected.
- Select “Write” and locate the new file to be written. Follow the prompts until completed.

Step 10:
Once the writing is completed you can turn off the power supply and disconnect the ECU.
Check all ECU pins are straight and have not been damaged before reconnecting the ECU to the vehicle. This is to prevent damaging the vehicle’s connector.

FAQs
If the issue can’t be rectifield using the FAQ, please open a support ticket on the job.
What to do if a dealer updates the ECU and the file is back to stock?
This can be checked and updated by doing the following:
- Locate the original job.
- Create a support ticket making note that the vehicle has been back to the dealer and possibly had the ECU updated by them.
- Compile a new read of the ECU and attach the new read file to the job.
- Request a checkover of the file and update the vehicle as required.
The laptop won't connect with the KESS3
- Try a different USB port.
- Disconnect BOTH USB and OBD. Now only connect the USB until Alientech Suite has re-established a connection, then plug into the OBD.
- Ensure that there is no external power supplying the KESS3.
- Restart laptop.
Message of "Incorrect Protocol"
An incorrect protocol has been selected. Double-check that you are using the correct protocol.
Go back to the search list to find a better match.
Read or Write has failed
- Is the internet still connected and strong?
- Was the ignition cycled incorrectly?
- Is the vehicle and /or laptop battery levels still correct?
- Is the KESS3 still plugged into the OBD or laptop?
I now have a check engine light on
Were they there before? (This is the reason it is important to check before starting work)
Did the manual or job note any changes required in connections etc? or instructions to save data before writing?
How do I get support on a job
If you need support on a job please go to the file service, click the job tab in the menu, located the job you need support on and open it. When you have opened the job you will see a “Support” button in the header next to a “Job” button. Click on the “Support” button. You have now arrived on the support page. On the support page you can tell us what you need help with or what issues you are having with the job as well as attach files. Submit your support ticket and one of our software engineers will shortly be ready with support.